Connect Zoho CRM to envoice
Audience: Shop owner (Admin) Time: 5 minutes to set up, then 1 minute per invoice
If you raise invoices in the Zoho CRM Invoices module (without Zoho Books), envoice submits them to LHDN MyInvois from inside Zoho CRM. The result (status, UUID, QR link) is written back onto the CRM invoice.
A sandbox demo with example data.
Before you start
- You have an envoice shop with your LHDN MyInvois credentials entered.
- You are an admin of your Zoho CRM organization.
- Your invoices are in Malaysian ringgit (MYR). Invoices in other currencies are not supported yet.
1. Install the envoice extension
The Zoho CRM extension is not on the Zoho Marketplace yet. Ask envoice at [email protected] for the private install link, open it while signed in to Zoho CRM as an admin. Tick both boxes, click Continue, choose who can use it, then Confirm.
2. Connect Zoho CRM in envoice
In envoice, open your shop, then Zoho Integration. Under Zoho CRM invoices, click Connect Zoho CRM and approve the access Zoho asks for.
envoice then adds its own fields to your CRM (MyInvois UUID, QR Link, Status, and buyer TIN and ID fields on Accounts and Contacts). Every field name starts with "envoice", so your own fields are never touched.
To give a product a default LHDN classification, set envoice LHDN Classification on the Product. A value on the invoice line still wins, and a line with neither files as 022 (Others).
One Zoho CRM organization links to one envoice shop.
If an envoice field goes missing (for example someone deleted it in Zoho CRM), the shop owner clicks Sync custom fields on the Zoho CRM invoices card in envoice. It creates only the missing fields. envoice also does this every night.
3. Find envoice on your invoices
Open any invoice in Zoho CRM. The extension adds LHDN MyInvois to the related lists on the left and a Submit to MyInvois button at the top. If LHDN MyInvois is missing, click Add Related List and pick it.
4. Submit an invoice
Open the invoice. The LHDN MyInvois list shows the invoice number, the buyer and Not submitted yet. Click Submit to MyInvois.
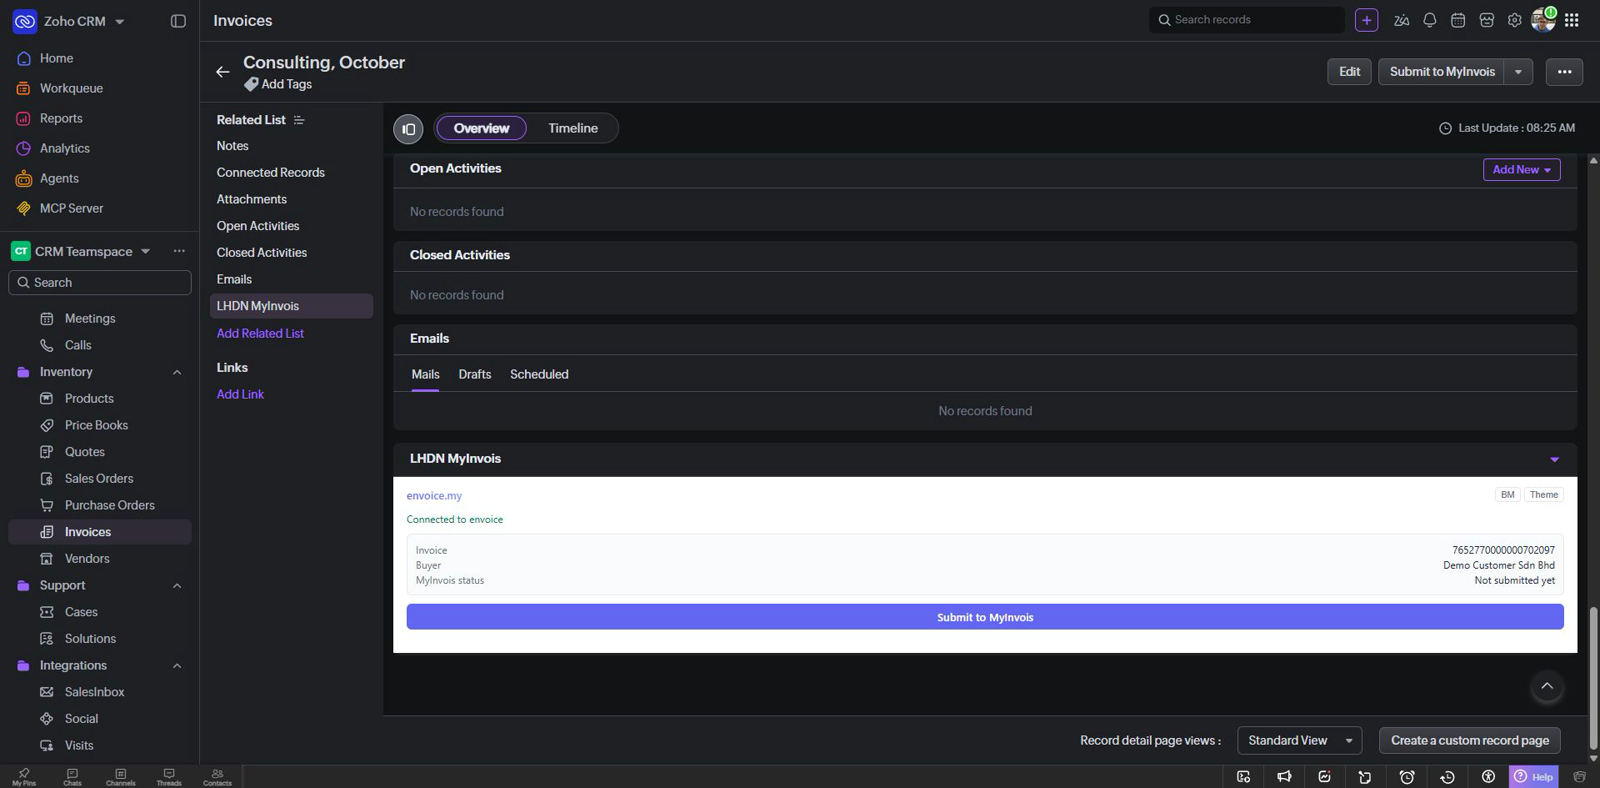
If something is missing (for example the buyer's TIN), envoice lists what to fix before you can submit. Fix it in Zoho CRM and open the invoice again.
If the buyer has no TIN, click Lookup TIN. envoice finds it on LHDN from the buyer's envoice ID Type and envoice ID Value and saves it to the Account or Contact.
After a few seconds the status changes to Validated, with the MyInvois UUID and a View on MyInvois link.
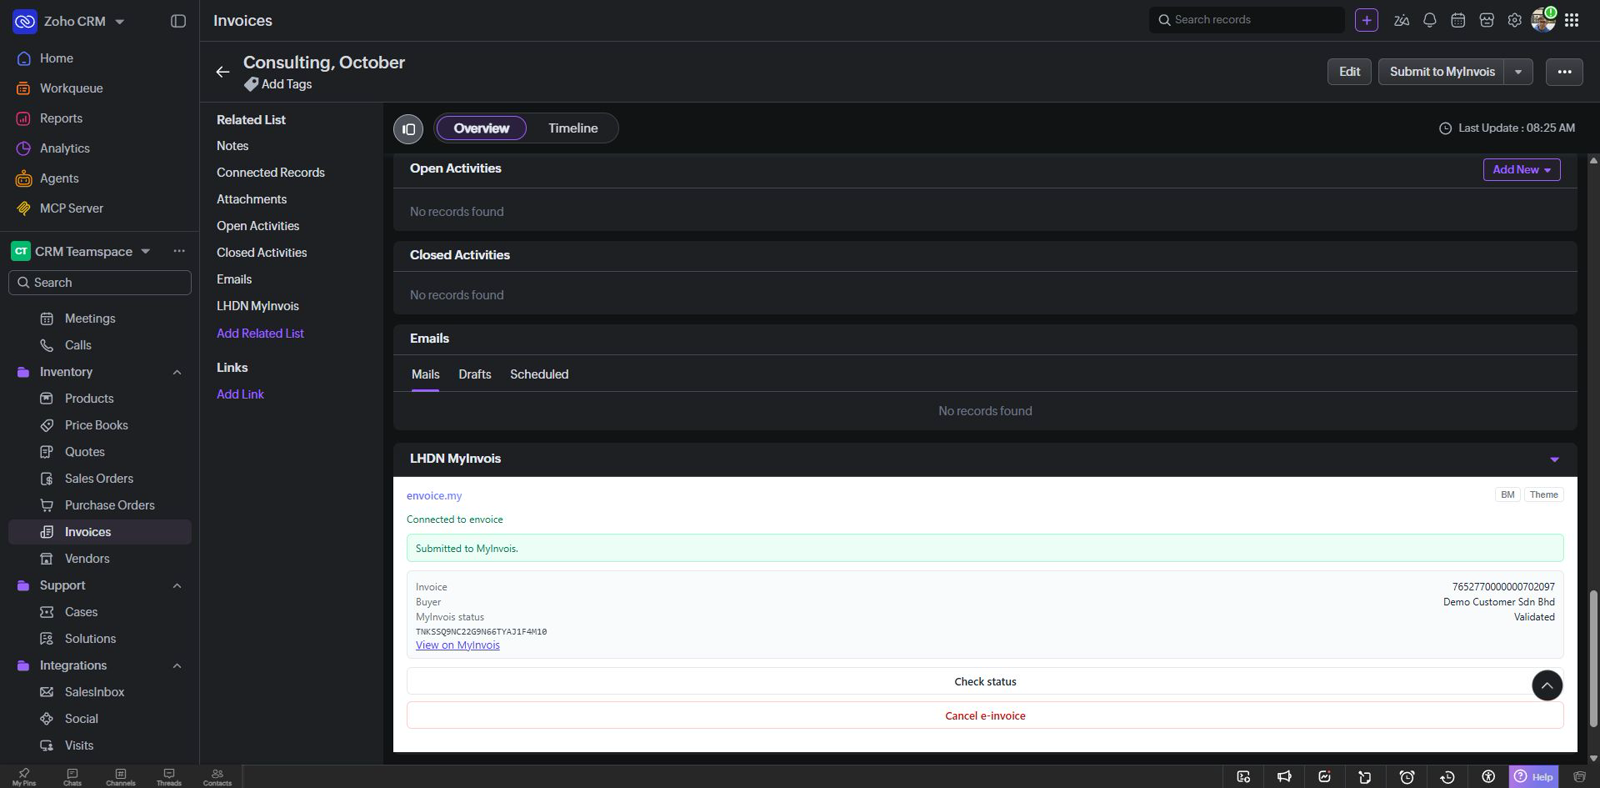
Draft (Created) and Cancelled invoices are never submitted.
5. Submit many invoices at once
In the Invoices list view, tick up to 25 invoices and click Submit to MyInvois in the toolbar. Click Submit 3 to MyInvois (the number matches your selection). envoice submits them one by one and shows the result for each invoice.
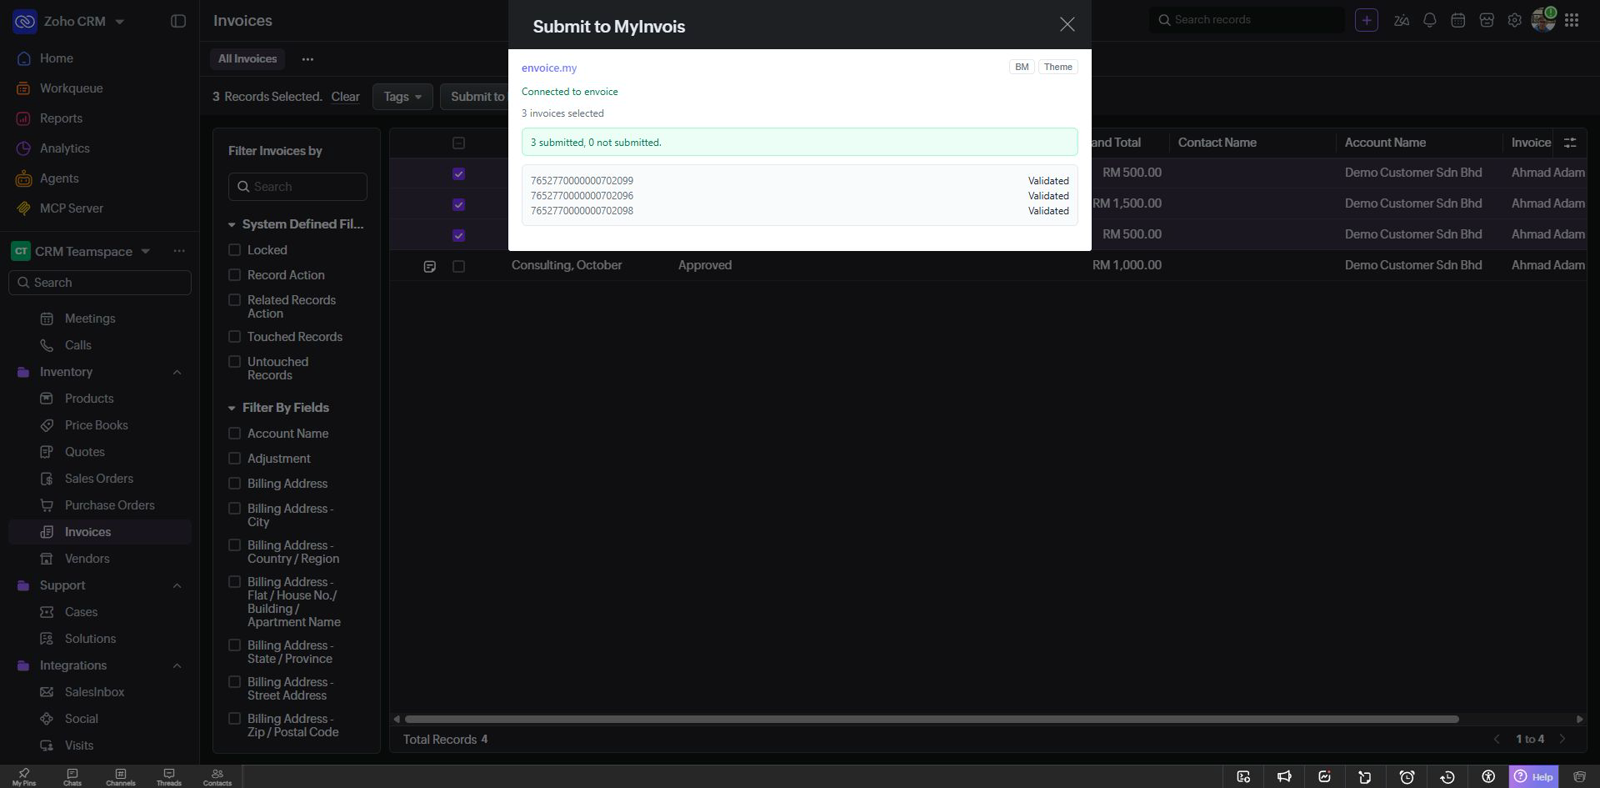
An invoice that cannot be submitted shows its reason in the list. The others still go through.
6. Check the status
LHDN sometimes takes a moment to validate. Click Check status on the invoice to get the latest result. envoice also checks in the background and updates the CRM invoice for you.
If LHDN rejects the invoice, the status shows Rejected by LHDN with LHDN's own reason under it. Fix the invoice in Zoho CRM, then click Submit to MyInvois again.
A cloned invoice carries the envoice fields of the invoice it was cloned from. envoice ignores them, submits the clone as a new invoice, and replaces them with the clone's own result.
7. Cancel an e-invoice
You can cancel within 72 hours of validation. Click Cancel e-invoice, type the reason (at least 5 characters) and click Confirm cancellation.
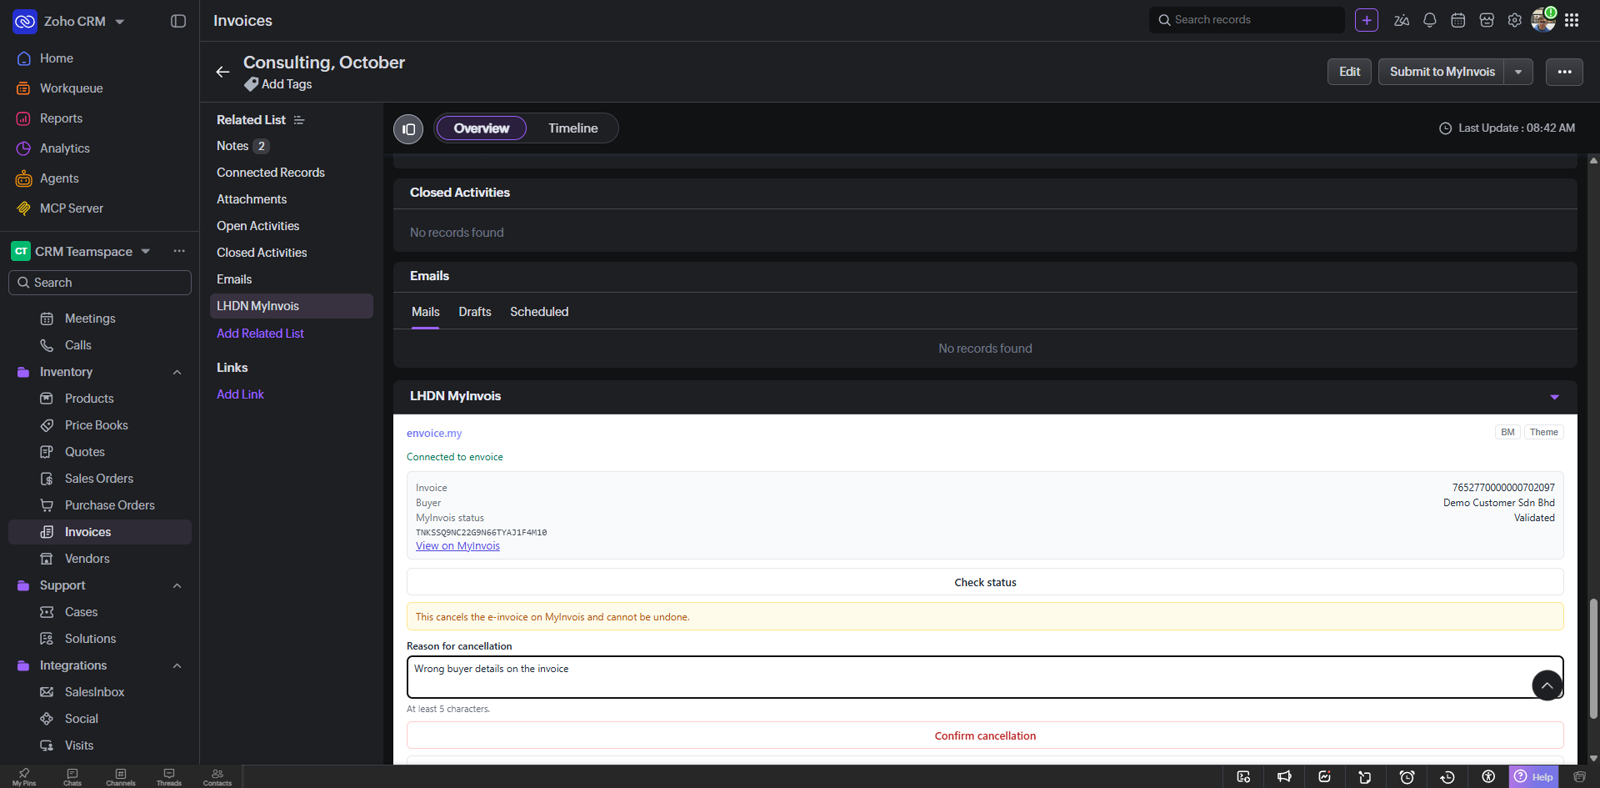
After 72 hours, cancelling is no longer possible. Issue a credit note instead: see Cancel or correct an e-invoice.
Put the MyInvois QR link on your invoice PDF
These steps are text only. The menu names may differ slightly in your Zoho CRM edition.
- In Zoho CRM, open Setup, then Customization, then Templates, and open your Invoices template.
- Where the QR should appear, insert the merge field envoice MyInvois QR Link from the Invoices fields.
- Save the template. A validated invoice then prints its MyInvois link, which the buyer can open to verify the e-invoice.
Send it on WhatsApp
When the invoice is Validated, click Send on WhatsApp. WhatsApp opens with your message and the MyInvois link, addressed to the phone on the buyer's Account or Contact. Edit the message in envoice under your shop's settings.
Also filed from Zoho Books?
If you use Zoho Books too, and an invoice with the same number was already filed from Zoho Books in the same shop, envoice stops and asks you to confirm. Click It is a different invoice, submit only if it really is a different invoice. Otherwise leave it, so nothing is filed twice.